You are viewing an old version of this page. View the current version.
Compare with Current
View Page History
Version 1
Next »
The 1st article presented you the hardware platform and the rationale behind the choices. Let's dive into the subject now !
Requirement- Basic Linux/Unix knowledge
- Service provider networking knowledge
| |
Overview
Several choices were possible, we finally ended up in following the KISS method. The Operating system requirements are:
- requirement #0: LTS operating system
- requirement #1: Benefit from LTS security patches
- requirement #2: Must be able to run dpdk
- requirement #3: (personal requirement) Must be familiar to me
- requirement #4: Able to run java software as freeRouter is written in Java
- requirement #5: small operating system software footprint
- requirement #6: Support for IPv4/IPv6
The hardest path would be:
The objective is to have a tight control of the software installed on the appliance. This guarantee the smallest footprint we hope to obtain. For those familiar with OpenWRT, we can reach a tiny image size. My OpenWRT image is 5Mb.
- Use of NixOS or Nix package manager
This provide an incredible feature: commit/rollback functionality at the package management level !
Article objective
In this article we will go through the major steps in deploying Debian 10 stable aka Buster in order to prepare freeRouter installation.
Diagrams

[ #002 ] - Cookbook
Operating system installation preparation
wget http://ftp.nl.debian.org/debian/dists/buster/main/installer-amd64/current/images/
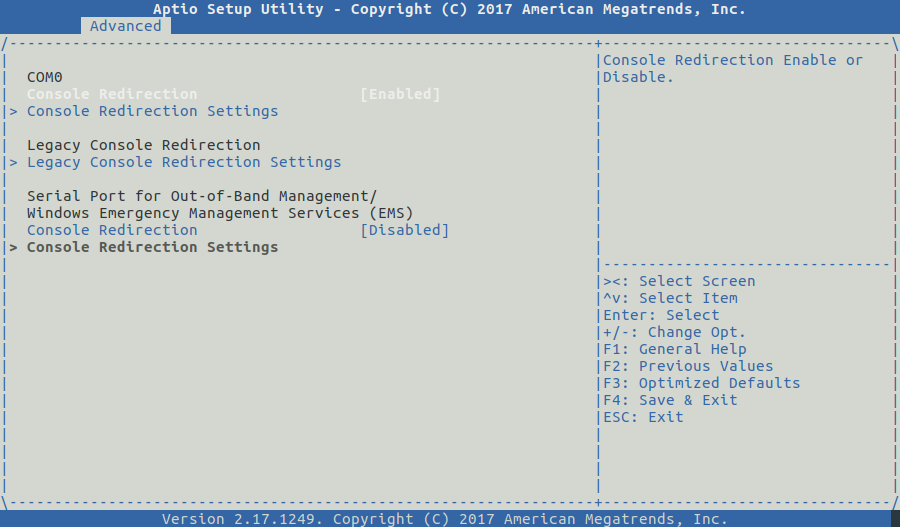
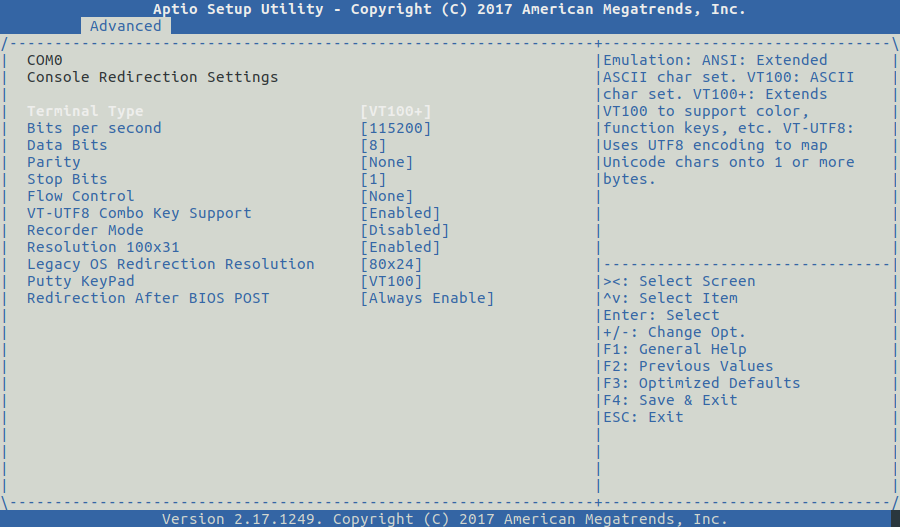
Via the appliance BIOS settings :
- activate console port redirection:

- configure serial port settings

Now that you have activated console port:
- plug the USB key on which you previously burnt Debian 10
- make sure you set boot option from USB in BIOS settings
- reboot
You can now proceed to next step: Debian 10 installation
Operating system installation
We will assume that you have installed Debian 10 in the 256 Gb SSD.
Just as a side note during the installation process you'll be prompted the: "Software selection" window, in this steps we will :
- unselect everything
- select "SSH server"

This will guarantee the tiniest Debian 10 operating system software footprint. We will on demand install the needed packages manually.
packages installation needed by RARE/freeRouter
On minimal installation sudo is not installed so all the software will be done as root.
apt-get update
apt-get install default-jre-headless
echo "deb http://deb.debian.org/debian buster-backports main" | tee /etc/apt/sources.list.d/buster-backports.list
apt-get update
apt-get install dpdk
apt-get update
apt-get install unzip net-tools libpcap-dev ethtool default-jre-headless psmisc tcpdump
create freeRouter /rtr folder
In this setup we will create a freeRouter folder at the filesystem root directory
cd /rtr
wget http://freerouter.nop.hu/rtr.jar
cd /rtr
tar xvf rtr.tar -C /rtr
rm rtr.tar
freeRouter systemd startup script
cat /lib/systemd/system/rtr.service

[Unit]
Description=router processes
Wants=network.target
After=network-pre.target
Before=network.target

[Service]
Type=forking
ExecStart=/rtr/hwdet-all.sh

[Install]
WantedBy=multi-user.target
cat /rtr/hwdet-all.sh

#!/bin/sh

cd /rtr
echo 1 > /proc/sys/net/ipv6/conf/all/disable_ipv6
echo 1 > /proc/sys/net/ipv6/conf/default/disable_ipv6
echo 0 > /proc/sys/net/ipv6/conf/lo/disable_ipv6
ip link set lo up mtu 65535
ip addr add 127.0.0.1/8 dev lo
ip addr add ::1/128 dev lo

# DPDK
echo 96 > /proc/sys/vm/nr_hugepages
modprobe uio_pci_generic

dpdk-devbind.py -b uio_pci_generic 01:00.0
dpdk-devbind.py -b uio_pci_generic 02:00.0
dpdk-devbind.py -b uio_pci_generic 05:00.0
dpdk-devbind.py -b uio_pci_generic 06:00.0
dpdk-devbind.py -b uio_pci_generic 07:00.0
dpdk-devbind.py -b uio_pci_generic 08:00.0

#VETH for CPU_PORT and OOBM_PORT
ip link add veth0a type veth peer name veth0b

ip link set veth0a multicast on
ip link set veth0a allmulti on
ip link set veth0a promisc on
ip link set veth0a mtu 8192
ip link set veth0a up

ip link set veth0b multicast on
ip link set veth0b allmulti on
ip link set veth0b promisc on
ip link set veth0b mtu 8192
ip link set veth0b up

ethtool -K veth0a rx off
ethtool -K veth0a tx off
ethtool -K veth0a sg off
ethtool -K veth0a tso off
ethtool -K veth0a ufo off
ethtool -K veth0a gso off
ethtool -K veth0a gro off
ethtool -K veth0a lro off
ethtool -K veth0a rxvlan off
ethtool -K veth0a txvlan off
ethtool -K veth0a ntuple off
ethtool -K veth0a rxhash off
ethtool --set-eee veth0a eee off

ethtool -K veth0b rx off
ethtool -K veth0b tx off
ethtool -K veth0b sg off
ethtool -K veth0b tso off
ethtool -K veth0b ufo off
ethtool -K veth0b gso off
ethtool -K veth0b gro off
ethtool -K veth0b lro off
ethtool -K veth0b rxvlan off
ethtool -K veth0b txvlan off
ethtool -K veth0b ntuple off
ethtool -K veth0b rxhash off
ethtool --set-eee veth0b eee off

ip link add veth1a type veth peer name veth1b

ip link set veth1a multicast on
ip link set veth1a allmulti on
ip link set veth1a promisc on
ip link set veth1a mtu 1500
ip link set veth1a up

ip link set veth1b multicast on
ip link set veth1b allmulti on
ip link set veth1b promisc on
ip link set veth1b mtu 8192
ip link set veth1b up

ip link set wlan0 up

ethtool -K veth1a rx off
ethtool -K veth1a tx off
ethtool -K veth1a sg off
ethtool -K veth1a tso off
ethtool -K veth1a ufo off
ethtool -K veth1a gso off
ethtool -K veth1a gro off
ethtool -K veth1a lro off
ethtool -K veth1a rxvlan off
ethtool -K veth1a txvlan off
ethtool -K veth1a ntuple off
ethtool -K veth1a rxhash off
ethtool --set-eee veth1a eee off

ethtool -K veth1b rx off
ethtool -K veth1b tx off
ethtool -K veth1b sg off
ethtool -K veth1b tso off
ethtool -K veth1b ufo off
ethtool -K veth1b gso off
ethtool -K veth1b gro off
ethtool -K veth1b lro off
ethtool -K veth1b rxvlan off
ethtool -K veth1b txvlan off
ethtool -K veth1b ntuple off
ethtool -K veth1b rxhash off
ethtool --set-eee veth1b eee off

ip addr flush dev veth1a
ip addr add 192.168.128.254/24 dev veth1a

#ADD DEFAULT ROUTE to OOBM SDN999
route add default gw 192.168.128.1

# START RTR !
start-stop-daemon -S -b -x /rtr/hwdet-main.sh
chmod u+x /rtr/hwdet-main.sh
Effectively start freeRouter main loop
start-stop-daemon -S -b -x /rtr/hwdet-main.sh
This main loop is triggered by the script hwdet-main.sh below:
cat /rtr/hwdet-main.sh

#!/bin/sh

while (true); do
  cd /rtr/
  stty raw < /dev/tty
  java -Xmx4g -jar /rtr/rtr.jar router /rtr/rtr-
  if [ $? -eq 4 ] ; then
    sync
    reboot -f
  fi
  stty cooked < /dev/tty
  sleep 1
done
Discussion
Design choice considerations
All the choices have been made in order to make the appliance resilient as much as possible and provide an enjoyable user experience. We will see in later article, a feature that I love: auto-upgrade. This will keep your appliance up to date obvr the network with the latest freeRouter train during low traffic period. Of course, for ISP P/PE core router we don't want this, but hey ! why not ? As soon as all customers are dual homed to 2 different PE reachable via 2 direct core path this can be achieve during low traffic period after having set the metric to infinity on all the PE/P box to be upgraded. (use IS-IS overload bit or OSPF max-metric router-lsa)
Conclusion
In this article, we got our hand dirty and installed manually freeRouter with DPDK dataplane from a clean slate environment. This is done on purpose as I'd like you to understand the whole installation process in details. There is an automated installation alternative that will install freeRouter also. However this is will install freeRouter with software backend. If your hardware CPU+NIC is compatible you can just replace the software backend by DPDK backend. At that precise point we have a vanilla genuine installation of freeRouter with DPDK dataplane on an appliance that can survive physical wild environment and power cut. We have just now to create the 2 freeRouter configuration files:
ls -l rtr-*
-rw-r--r-- 1 root root  646 Jul 31 17:03 rtr-hw.txt
-rw-r--r-- 1 root root 9027 Aug 25 10:02 rtr-sw.txt
)


